Waves Cobalt Saphira Harmonic Enhancer is now available at the introductory price of $99. Offering a new level of musicality and control, it’s an advanced harmonics shaping tool that lets you add rich harmonics to your tracks in order to give them analog musicality, depth and “glue.”
Click Here to get Cobalt Saphira for $99
Click Here to get Cobalt Saphira for $99
A NEW LEVEL OF CONTROL
Waves Cobalt Saphira gives you an unprecedented level of digital control over different aspects of the harmonics you are adding:
- Edge and Warmth – for separately controlling and balancing even and odd harmonics
- 4-band EQ – for separately shaping the frequency spectrum of each type of harmonics
- Harmonics modes – seven different modes, with graphical representation so you can see the changes in harmonic structure
- Tape – five tape speeds for adding wow-and-flutter modulation in order to give your tracks extra musicality and depth
A NEW WAY TO GLUE YOUR TRACKS
We often use the term “glue” when touting the benefits of compression. But the “glue” we hear from a good compressor is many times the result of added harmonics. Cobalt Saphira lets you directly control your harmonics without compression, helping to glue your tracks and turn them into a more musical, cohesive mix.
ADDED DEPTH
Achieving balance and clarity in a mix is expected. Achieving real depth in a mix is where they single out the pros. Cobalt Saphira allows you to inject this sought-after quality into your mixes.
Excelling on groups and sub-mixes and in mastering situations, Cobalt Saphira gives you rich harmonic enhancement that can be creatively tailored exactly how you like it — a full palette of analog sound for you to pour all over your tracks.
Waves Cobalt Saphira is the first in the new Cobalt line of Waves plugins. COBALT – Analog that Only Digital Can Achieve
- Analog harmonic enhancement with full digital control
- Edge and Warmth controls – allowing you to balance tube, solid-state and transformer qualities in order to achieve various levels of even and odd harmonic enhancement
- 4-band EQ for separate control of the frequency spectrum of the even (Edge) and odd (Warmth) harmonics
- Seven different harmonics modes for your tweaking pleasure
- Tape depth with five different tape speeds to choose from
- Great for “gluing” your sub-groups and master buss
Click Here to get Cobalt Saphira for $99
Waves Cobalt Saphira User Guide
TABLE OF CONTENTS
Chapter 1 – Introduction
1.1 Welcome
1.2 Product Overview
1.3 Components
Chapter 2 – Quick Start Guide
Chapter 3 – Interface and Controls
3.1 Interface
3.2 Controls
3.3 Cobalt Saphira Signal Flow
Chapter 4 – The WaveSystem
4.1 The WaveSystem Toolbar
4.2 Preset Handling
4.3 Interface and Controls
4.4 Waves Preferences (Pro Tools only)
Waves Cobalt Saphira User Guide
Chapter 1 – Introduction
1.1 Welcome
Thank you for choosing Waves. In order to get the most out of your Waves processor, please take the time to read through this manual. We also suggest you become familiar with www.waves.com/support. There you will find an extensive answer base, the latest tech specs, detailed installation guides, new software updates, and current information on licensing and registration. By signing up at www.waves.com, you will receive personalized information on your registered products, reminders when updates are available, and information on your authorization status.
1.2 Product Overview
Cobalt Saphira is the first plugin in the new Cobalt line of groundbreaking products from Waves. With analog characteristics that only digital can achieve, Cobalt Saphira takes everything we know about harmonic enhancement and puts you in the driver’s seat with a digital dashboard. Cobalt Saphira provides instant harmonic depth, richness and added dimension to the source material, with minimal impact on the other characteristics of your sound.
Added warmth, “glue,” and depth are but some of the benefits that Cobalt Saphira contributes to your overall mix:
Warmth: No one can accurately define the word “warm” in a musical setting, but we all know it when we hear it, and virtually every pair of ears is pleased by the warmth we hear when a signal is passed through analog circuitry.
Glue: The term “glue” is often used to refer to the benefits of compression. But all it really describes is when tracks sound more like a coherent mix than a cluster of individual tracks. Cobalt Saphira is an excellent tool to provide glue for groups and sub- mixes as well as in mastering situations.
Depth: Achieving balance and clarity in a mix is expected. Achieving depth in a mix is where they single out the pros. Thanks to Waves’ optimized integration of analog modeling and digital innovation, Cobalt Saphira allows you to inject real depth into your mixes with unmatched simplicity.
Whether mixing or mastering, live or in the studio, Cobalt Saphira gives you rich harmonic enhancement that can be creatively tailored exactly how you like it – a full palette of analog colors for you to pour all over your tracks. With its Edge and Warmth harmonics generation engines, different tape modulations and harmonic filters, Cobalt Saphira gives you detailed control over the harmonic content of any musical material, delivering that “little extra something” that can change the entire feel of an instrument or song.
A Few Words about Harmonics
Instruments playing a note usually do not produce clean sinusoids. For example, the A string of a guitar does not produce a pure 110 Hz frequency. Due to uneven string vibration, guitar body resonance, etc. it also produces additional resonating frequencies, also known as overtones and harmonics (whole-number multipliers of the frequency: harmonics are always overtones, but not all overtones are harmonics). These phenomena add to the rich sound of guitar playing.
Electrical circuits also add harmonics to the signals that pass through them due to their imperfect, non-symmetrical components. The harmonic content produced by these imperfections creates the sense of richness and depth.
There are two types of harmonics, even and odd, depending on the multiplier of the fundamental frequency. For example, if your fundamental signal is a 1 kHz sine tone, then 2 kHz is an even harmonic, while 3 kHz is an odd harmonic. A sound’s harmonic structure is determined by certain attributes:
• Amplitude: Harmonics are very level-dependent in nature. Usually, the higher the signal, the more harmonics are present.
• General relationship between even and odd harmonics.
• Specific relationships between individual harmonics.
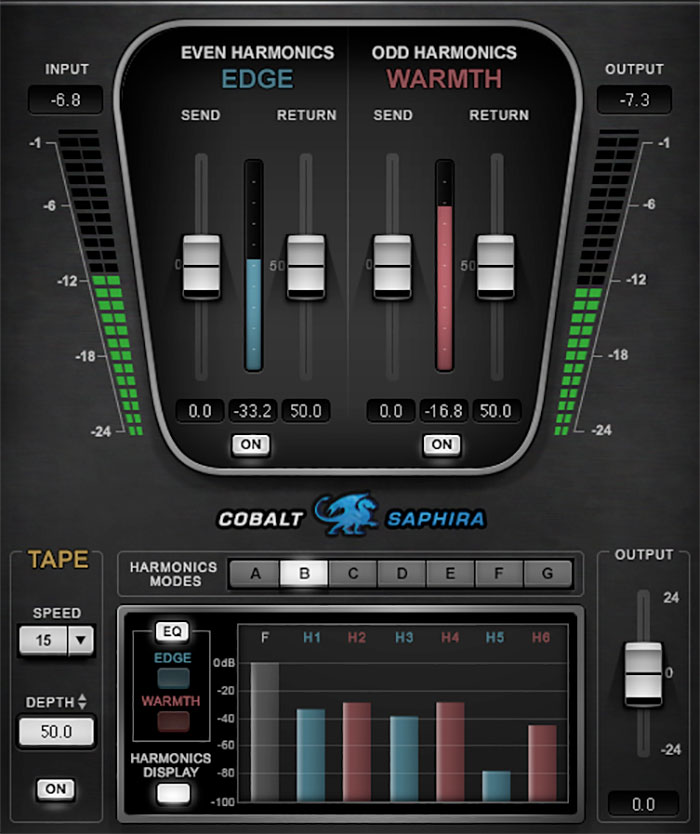
Cobalt Saphira offers a wide variety of harmonic structures, and it’s important that you experiment with them to hear the differences. Use the Send and Return sliders to control the signal’s harmonics. The Send control defines what portion of the signal’s amplitude will receive the selected harmonics. Higher settings mean that more generated harmonics are added to the signal. The Return control manages the level of the odd and even harmonics. Send value is akin to the level of audio entering a compressor. It determines much of the behavior of the processor, while the amount of Return controls the output level of the section.
Adding harmonics will slightly change the tonality of the sound. It takes some practice to hear these nuances, but the more you play with Cobalt Saphira, the easier it will become to hear the effect. Once you understand what harmonics can do for you and how to manipulate them, you will discover a whole new world of options for shaping your sound.
1.3 Components
WaveShell technology enables us to split Waves processors into smaller plugins, which we call components. Having a choice of components for a particular processor gives you the flexibility to choose the configuration best suited to your material.
The Cobalt Saphira plugin has two components:
• Cobalt Saphira Mono – mono in to mono out
• Cobalt Saphira Stereo – stereo in to stereo out
Chapter 2 – Quick Start Guide
1. Always work in context. If you use Saphira on soloed tracks you may miss its impact on the whole mix.
2. Saphira works best on complex, loud signals, so master groups and the master buss are good places to start.
3. Experiment with the different harmonics modes to find the best match for the material.
4. A good way to start is to go over the presets supplied, find something you like, and then fine-tune the settings, if needed.
5. Adjust the Send control of each harmonic type. When you hear that the signal is getting compressed, back off a bit until you hear it breathing again.
6. Adjust the Harmonics Return to set the amount of overall harmonics.
7. Add some Tape Depth. As you increase this setting, you will likely sense an “aliveness” and added depth to the image. The setting is too high if the sound becomes “wobbly” and unstable. The perfect setting lies somewhere in the middle.
8. Use the 4-band EQ supplied on each of the Harmonics sections (Edge and Warmth) to shape the harmonics.
9. Adjust the Output level to offset any gain changes caused by processing.
Waves Cobalt Saphira User Guide
Chapter 3 – Interface and Controls
3.1 Interface
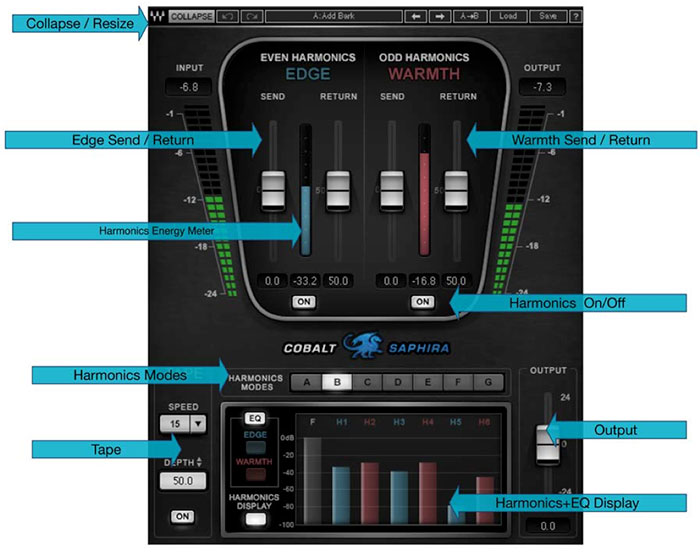
3.2 Controls
Edge – Even Harmonics
Send: Adjusts the level of the signal going into the Edge (Even) Harmonics generator. The signal is compensated before being summed together with the input signal, so when you increase Send, only the amount of harmonics you hear will change, not the level. Range: -30 to 30 dB in 0.1 dB increments
Default: 0
Return: Increases the overall level of the Edge Harmonics shaped by the Send control, providing more “Edge.”
Range: 0 to 100 dB in 0.1 dB increments
Default: 50
On/Off: Toggles the Edge Harmonics on or off. Default: On
Warmth – Odd Harmonics
Send: Adjusts the level of the signal going into the Warmth (Odd) Harmonics generator. The signal is compensated before being summed together with the input signal, so when you increase Send, the amount of harmonics you hear will change, but not the level. Note that odd harmonics add slightly to the level of the fundamental frequency, so adding lots of Odd harmonics will cause an overall level increase despite the compensation!
Range: -30 to 30 dB in 0.1-dB increments Default: 0
Return: Increases the overall level of the Warmth Harmonics shaped by the Send control, providing more “Warmth.”
Range: 0 to 100 dB in 0.1-dB increments
Default: 50
On/Off: Toggles the Edge Harmonics on or off. Default: On
Waves Cobalt Saphira User Guide
Tape Speed
This pull-down window toggles between five different tape speeds: 71⁄2, 111⁄4, 15, 221⁄2 and 30 ips (inches per second). Higher speeds result in faster and more noticeable modulation.
Default: 15 ips
Tape – Depth
Increases the level of the AM/FM (Wow and Flutter) modulation, providing more depth. Range: 0 to 100 in 0.1 dB increments
Default: 50
Tape Depth On/Off
Toggles the tape modulation effect on or off.
Harmonics Modes
These radio buttons toggle between seven different harmonic structures of odd and even harmonics.
The Harmonics modes are:
A, B, D
C
E, F, G
Use the Harmonics Display button to see the different harmonic structures as you toggle between modes. When moving the Edge or Warmth slider, a representation of the change in harmonics structure is displayed in this window. Note: This window is for display purposes only. It does not represent the exact harmonic level, as this may vary depending on the input signal.
Natural Punch Dirt
Edge EQ
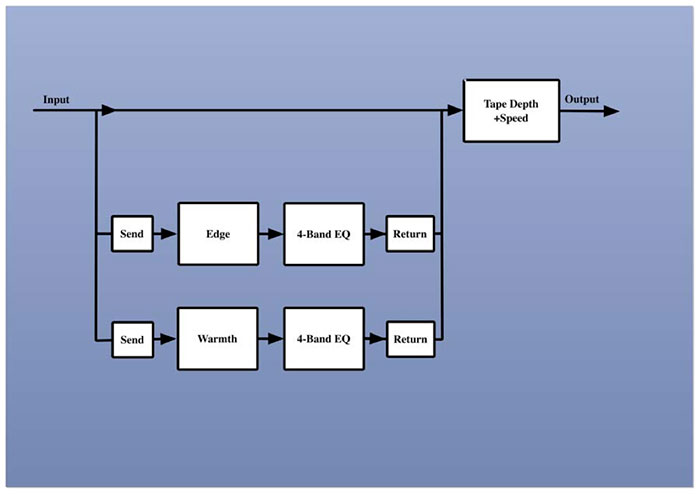
Clicking on this control will let you control a 4-band EQ that is applied after the Edge Harmonics are added to the signal but before it is mixed together with the direct signal. The 4-band EQ has the following properties:
Band 1: Selectable High Pass or Low Shelf, with variable Gain and Frequency settings.
Frequency range: 16 to 21357 Hz
Gain range: -18 to 18 dB
Band 2: A bell-type filter with variable controls over Gain, Frequency, and Q.
Frequency range: 16 to 21357 Hz Gain range: -18 to 18 dB
Q range: 0.26 to 6.5
Band 3: A bell-type filter with variable controls over Gain, Frequency, and Q. Frequency range: 16 to 21357 Hz
Gain range: -18 to 18 dB
Q range: 0.26 to 6.5
Band 4: Selectable Low Pass or High Shelf, with variable Gain and Frequency settings. Frequency range: 21357 to 16 Hz
Gain range: -18 to 18 dB
Warmth EQ
Controls a 4-band EQ that is applied after the Warmth Harmonics are added to the signal but before it is mixed together with the direct signal.
The 4-band EQ has the following properties:
Band 1: Selectable High Pass or Low Shelf, with variable Gain and Frequency settings.
Frequency range: 16 to 21357 Hz
Gain range: -18 to 18 dB
Band 2: A bell-type filter with variable controls over Gain, Frequency, and Q.
Frequency range: 16 to 21357 Hz Gain range: -18 to 18 dB
Q range: 0.26 to 6.5
Band 3: A bell-type filter with variable controls over Gain, Frequency, and Q. Frequency range: 16 to 21357 Hz
Gain range: -18 to 18 dB
Q range: 0.26 to 6.5
Band 4: Selectable Low Pass or High Shelf, with variable Gain and Frequency settings. Frequency range: 21357 to 16 Hz
Gain range: -18 to 18 dB
EQ Bypass
Bypasses both Edge and Warmth EQs.
Output
Adjusts the output level of Cobalt Saphira.
Your output level will not change when you load a preset. Range: -24 to 24 dB in 0.1 dB increments
Default: 0
3.3 Cobalt Saphira Signal Flow
Chapter 4 – The WaveSystem
4.1 The WaveSystem Toolbar
All Waves plugins feature the WaveSystem toolbar, which takes care of most of the administrative functions you will encounter while working with your Waves software. The features of the WaveSystem toolbar are the same on practically all Waves plugins, so familiarity with its features will be helpful whichever plugin you are using.
Toolbar Functions
Undo
Redo Setup A/B settings L/R Arrows Copy A→B Load
Save ?
Opens the plugin About box
Undoes the last 32 actions
Redoes the last 32 undone actions
Toggles between two presets, useful for comparison of parameter
Move to the previous or next preset
Copies the current settings to the second preset register Recalls presets from file
Saves presets in the Waves file formats
Opens the PDF manual for the plugin you are using
4.2 Preset Handling Preset Types
Factory Presets are permanent presets in the Load menu. Factory presets cannot be overwritten or deleted. When applicable, different component plugins may have different factory presets.
User Presets are your favorite settings of the plugin saved as a preset in the Load menu, under ‘User Presets’. User Presets can be overwritten and deleted.
Setup Files may contain more than one preset. For example, a single file can contain all the presets for a session. When you open a Setup File, all its setups become part of your Load pop-up menu for fast access. This can be particularly useful with multiple instances of a plugin in a single session. By saving all the settings you create into a single Setup File, they can all be quickly available for every instance of that plugin.
Loading Presets and Setups
Click on the Load button to see the Load pop-up menu. The menu is divided into four sections. If a section is not currently available it will not appear in the Load pop-up menu. Preset File… Select to open any setup or preset file, whether from the Library or your own creations.
‘Filename.xps’: Displays any currently loaded Setup File and its presets. Factory Presets: Displays the default Factory Presets.
User Presets: Displays any loaded User Presets.
Saving Presets and Setups
Click on the Save button to see the Save pop-up menu. Four options are available. If an option is not currently available it will be grayed out and inaccessible.
Save to New File… Select this to start a new Setup file. There are two prompts – first for the setup filename, then for the preset name. You must provide a name for both the setup file and the preset. Click OK (ENTER) to complete the save. It is a good idea to create a folder in which to save several setup files for a project.
Save ‘File Name’ – “Preset Name” Overwrites the settings of the loaded preset (whether a User Preset or a preset from a Setup File) with the current settings. If a Setup File is currently loaded, the name of the Setup File is displayed followed by the name of the preset itself. If a User Preset is loaded, its name is displayed.
Save to ‘File Name’ As… Saves the current settings as a new preset into the Setup file that is open (if one is not open, the option is grayed out). You will be prompted to give the preset a name.
Put into Preset Menu As… Save the current settings into a User Preset that will always be in your Load menu (until deleted). You will be prompted to give this preset a name. User Presets are stored in the plugin’s preference file.
Deleting Presets
You may delete User Presets and presets within a Setup File. Factory Presets and Setup Library files cannot be deleted or overwritten.
1. Hold the Command (Mac)/Control (PC) key down.
2. Click-and-hold the Load button to see the pop-up menu.
3. While still holding the Command/Control key, select the preset or setup to delete. 4. A confirmation box will appear, allowing you to cancel or ‘OK’ the deletion.
A/B Comparison and Copying
The Setup A/Setup B button may be clicked to compare two settings. If you load a preset in the Setup B position, this will not affect the preset loaded into the Setup A position, and vice-versa.
If you want to slightly modify the settings in Setup A, you can copy them to Setup B by clicking on the “Copy to B” button, then altering Setup A and comparing with the original Setup B.
The name of the current setup will be shown in the title bar (on platforms which support it), and will switch as you change from Setup A to Setup B.
Note: an asterisk will be added to the preset name when a change is made to the preset.
4.3 Interface and Controls
Controls can be in one of three states:
1. Not Selected where the control is not the target of any user entry
2. Selected where the control is the target of mouse control entry only
3. Selected and Active where the control is the target for both mouse and keyboard
entry
Toggle Buttons
Toggle buttons display the state of a control, and allow switching between two or more states. Single-click to change the control’s state. Some toggle buttons have a text display which updates with the current setting, and others (bypass, solo, or monitoring toggles) illuminate when the control is active.
Some plugins have link buttons between a pair of toggle buttons, allowing click-and- drag adjustment while retaining the offset between the controls.
Value Window Buttons
Value windows display the value of a control and allow click-and-drag adjustment, or
direct control via the keyboard.
❖ Usingthemouse,click-and-drag on the value window to adjust. Somevalue windows support left/right, some up/down (as you hover over a button, arrows will appear to let you know which direction of movement that button supports). You may also use your mouse-wheel to adjust parameter values.
❖ Using the arrow keys, click once with mouse to select the button, and then use up/down – left/right (depending on the direction supported by that button) to move in the smallest incremental steps across the button’s range (holding down the arrow keys will move faster through the range).
❖ Using key entry, double-click on the button to open the value window, and directly enter the value from your keyboard. If you enter an out of range number, the button stays selected but remains at the current setting (system beeps if system sounds are on).
Some plugins have link buttons between a pair of value windows, allowing click-and- drag adjustment while retaining the offset between the controls.
Sliders
Click or scroll the mouse-wheel on the slider itself or anywhere within the sliders track. The numerical value of the slider settings is displayed in a hover window above the slider path.
Hover Box
Hovering boxes will appear and display the control value when hovering with the mouse over the control.
Multiple Control Selection
One of the most powerful features of the WaveSystem is the ability to select and adjust multiple controls simultaneously. Using the mouse, drag-select the desired group of buttons or graphic controls by clicking and holding at a point outside the controls, and forming a rectangle that includes the controls you wish to adjust. Alternatively, press and hold Shift while clicking the mouse on any control you wish to link. This method is useful when you want to select two or more controls that are not adjacent to one another.
TAB Functions
TAB moves the ‘selected’ status to the next control, with shift-TAB moving in the reverse direction. Additionally, the Mac has an option-TAB function for ‘down’ movement and shift-option-TAB for ‘up’ movement where applicable. If you have several Value Window Buttons selected, TAB functions will take you through the selected controls only. Hitting Esc or Return will return the ‘focus’ to the DAW application.
A Note on Automation
When you automate settings in Stereo mode, your settings will be saved for the specific channel (L or R) you have selected, but will affect both L and R.
When you automate L and R to different values in modes other than Stereo, but then wish to return to Stereo mode, you will need to delete your settings for one of the sides (L or R) before you return to Stereo mode in order to avoid conflicting values.
4.4 Waves Preferences (Pro Tools only)
When launching Pro Tools, hold Shift to view the Waves plugin Preferences window. The following options are available:
• Don’t use AudioSuite plugins
• Don’t use RTAS plugins
• Rescan all plugins
• HUI control surface support (low resolution)
• Enable single-click text entry
Waves Cobalt Saphira User Guide
Click Here to get Cobalt Saphira for $99